

You’ll need:
... 1 “gumdrop” eye bead from
Nightside Studios
....2 smaller accent beads (size isn’t
critical as long as they look pleasing flanking the eye bead)
....About 1 gram 11/0 seedbeads, any color
or colors
....Beading needle, size 10 or 12
....Beading thread (I like Fireline size
B, but you can use your favorite)
Overview:
With a square stitch, start the ring’s band.
Switch to daisy chain stitch to add the first accent bead, the eye bead and the second accent beads.
Return to square stitch to finish the band to fit the finger it’s
meant for. Weave the two ends together.
Step 1
Start the band
Thread your needle with about 48 inches of thread. Pick up four seed beads for the first row. Pick up one bead to start the second row, and pass needle through the last bead of the first row, in the same direction as the first pass. You’ll see this makes the first bead of the second row stack on top of the last bead of the first row. (figure 1)
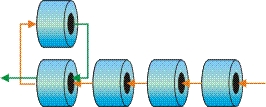
Repeat this step for four beads. You’ve finished the second row.
(figure 2)
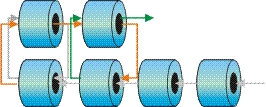
Turn the work and make a third row. Then stitch one more row of square stitch, to give yourself a tab to hold onto while you add the first accent bead.
Step 2
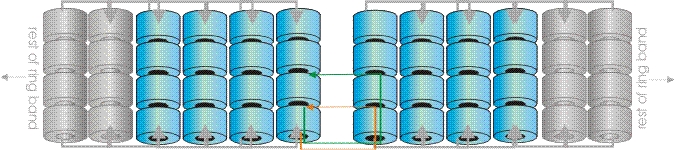
Add first accent bead
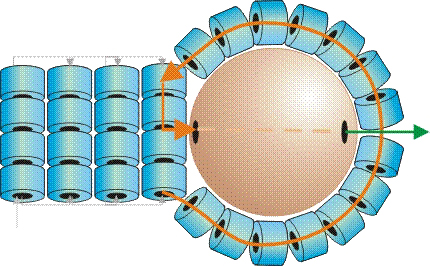
Exiting the end of the last square-stitch row, pick up enough beads to go completely around your accent bead (including the four beads of the last row you stitched). Stitch up through the first two beads of your last square stitch row (all you’re doing here is snugly encircling your accent bead with seed beads ).
Exiting the second bead of the last square-stitch row, go through the accent bead. (figure 3)
Step 3
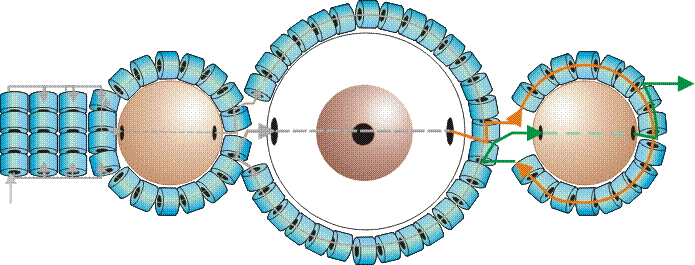
Add the eye bead
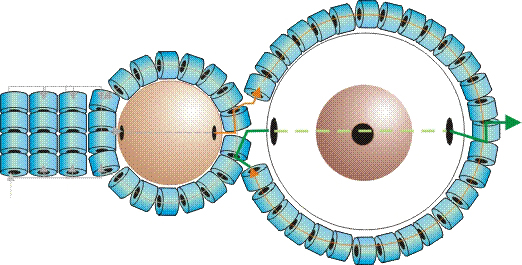
Pass needle up through one or two beads on the side opposite the band - you’re getting into position to add the eye bead.
Pick up enough beads to circle the eye bead, including two to four beads
where it meets the accent bead (the number of beads you pick up depends
on the size of the eye bead and accent bead, which can vary). Go through
the first two of these four beads, and then through the eye bead, coming
out the opposite side and going up through a couple of beads, to get into
position to add the second accent bead.
(figure 4)
Step 4
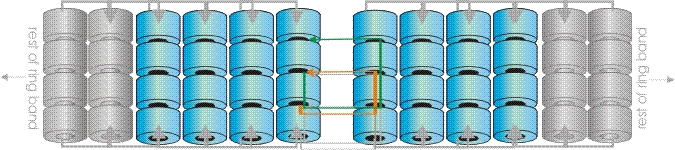
Add the second accent bead
Remember those instructions in Step 2?
Now you're going to do them in reverse.
Pick up enough beads to circle the accent bead, including two to four
beads where it meets the accent bead.
Go through the first two of these four beads, and then through the accent
bead, coming out the opposite side and going up through a couple of beads,
to get into position to start stitching the rest of the band. (figure
5)
Step 5
Finishing the ring
Returning to square stitch, start stitching the band off the four beads
on the outside of the last accent bead.
(figures 6 and 7)


Step 6
Finishing the ring (cont.)
Add more rows of square stitch until the band fits around the finger that will wear the ring. (figure 9)
Use square stitch to join the two ends of the band. (figure 10)
Make a few half-hitch knots, sew in tails and trim. You've done it!